Granny square blanket nr 2 !
Okay, so I had been thinking about re-doing the first granny square blanket I ever made. I did the blanket way before I even met Micke, so it's more than 5 years old! The squares are all in white and brown; some of the white was from an H&M woolen sweater that had shrunk in the washer by accident. The rest if the yarn were left-overs I got from Mom.
Back when I made it, I put the squares together using needle and thread, but I was NEVER happy with the result. Since I wasn't that good at crocheting then, no two squares were alike in texture or size. The blanket was clearly a mess, and you can see it on the first pic! For lack of better words: it needed makeover.

Taking apart the blanket, square by square.
First, I had to remove the old seam without harming the squares. After that, I had to re-crochet a MAJOR part of the squares (all except maybe 5...). This because I needed the majority of them to have the same gauge and thickness, otherwise the new blanket would be as wildly out of proportions as the old one had been. This took a while, and I cursed the yarn and my (then) lousy workmanship a LOT. Micke can testify to this.
So, how to put them all together this time? Well, I had borrowed this crafts-book from the library that's called
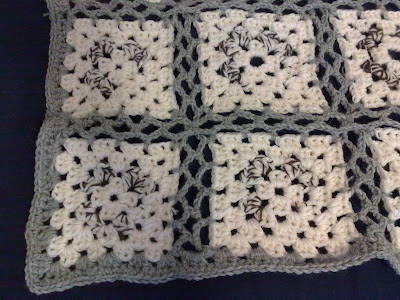
Hippie Crafts: Creating a Hip New Look Using Groovy '60s Crafts written by Joanne O'Sullivan. In it, I found a way to crochet together the squares so that the seam will become a design element in itself. It will look as if there's waves between every square, and the waves will keep the blanket both airy and very flexible.

All squares put together one way, using the "new" method.
The scissors (palm sized) are there for size-reference.
The scissors (palm sized) are there for size-reference.
Thanks to the seam, the blanket got ~10 % larger than it had been in the first place, which was a relief since it had been ... well, a not so "optimal"-sized blanket to begin with. Now, you can wrap it around your legs much better.
One thing I have to say about this new seam though, and that's that it takes MUCH more yarn than just sewing or crocheting it together "normally". This "little" blanket took 2 and 1/2 balls of the gray yarn (50 g / ball), which is more than twice the amount that was used when just sewing it together.


After putting the squares together cross-wise,
the blanket got "framed" by this simple border.
The border is 2 rows; one with the same granny
square pattern, and one with single crochet.

At the corners between the squares, they're put together like this.
There wasn't any picture of this in the book, and the pattern
description didn't say how to do it, so I did it like this.

This is how big it got. It's more a square than a rectangle now,
but I like it like this. The rectangle-blanket was SO small.


Very VERY good job you did there. I would have tossed it, haha, into the trash. I like the joining you did.
ReplyDeleteAmbar in Puerto Rico
Thank you Ambar! I actually considered tossing it away too, but then I just couldn't because of all the work I had once put into it... And besides, I really liked the colors. Which just proves what a sucker I am for trying to "save" things :)
ReplyDelete