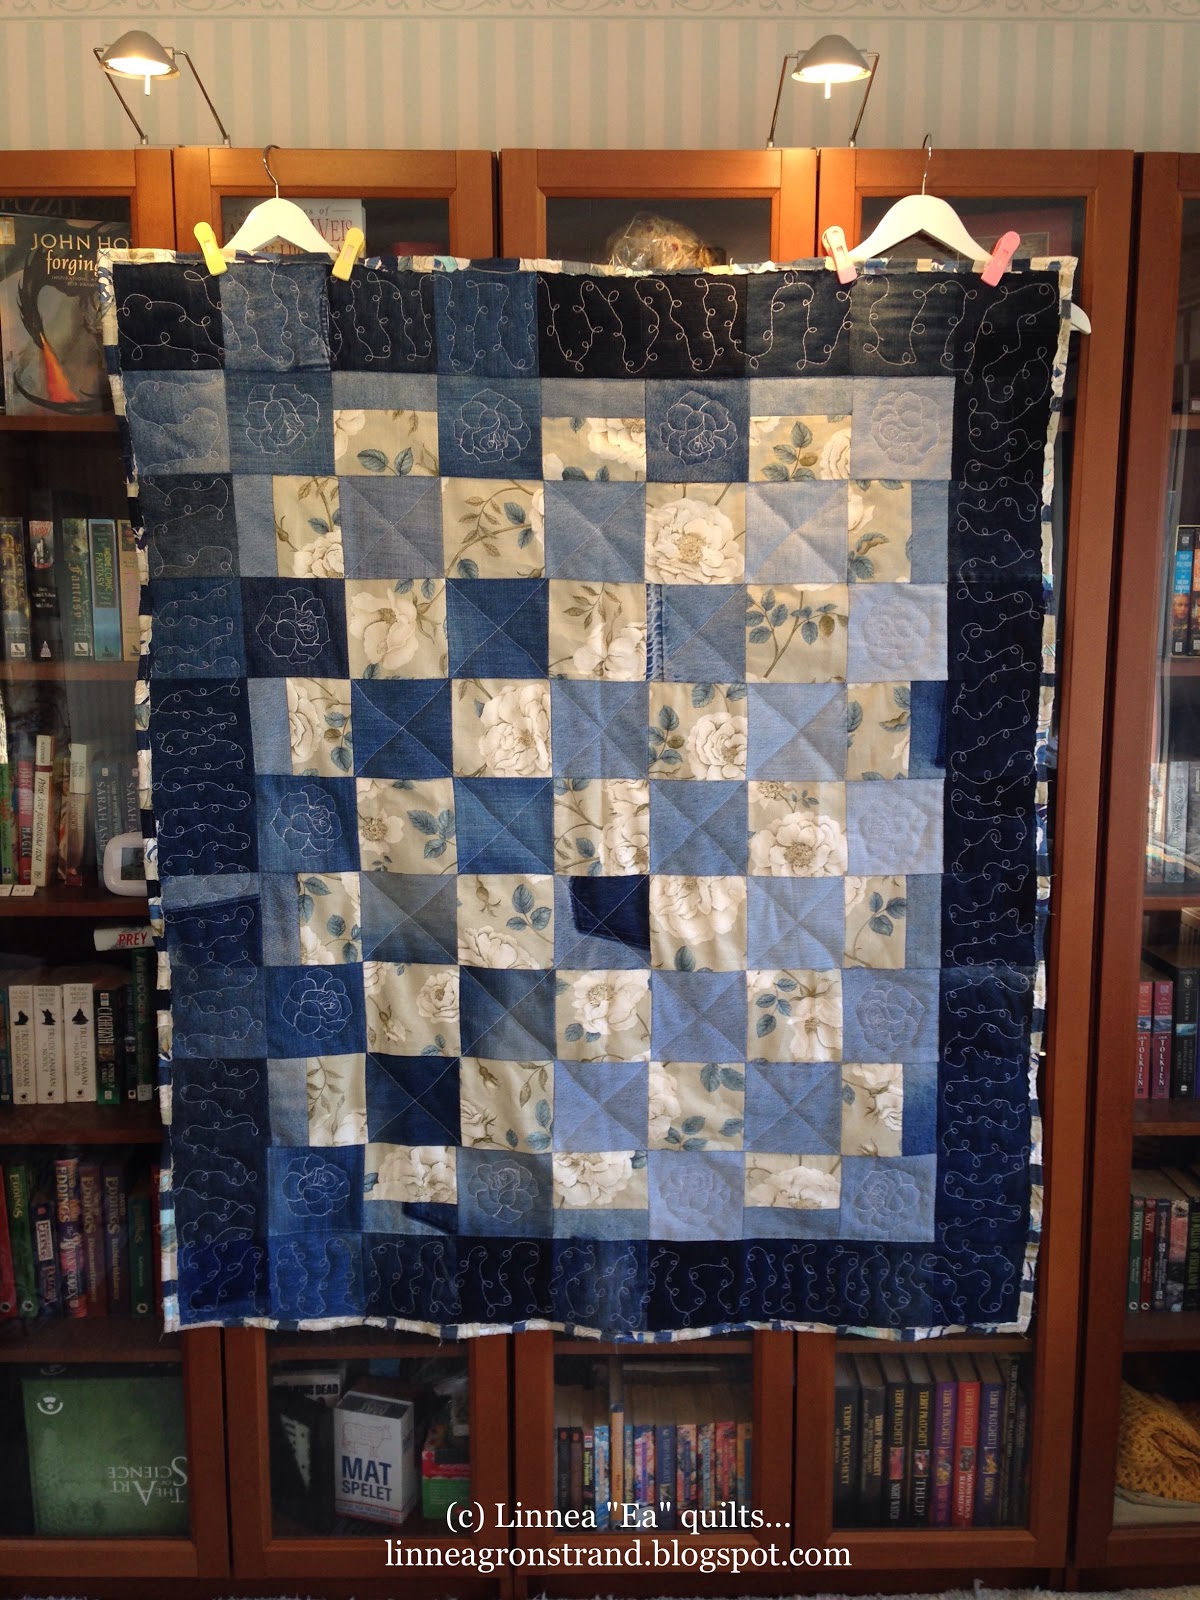
Finished quilt: Blue Roses and Denim
Quilt details
Name, Recipient, Size, Start/Finished date, Pattern and Fabrics used
- Blue Roses and Denim quilt, also known as ”Rosalie"
- I made it for me, to match the fabrics on my office chair..
- 123 x 147 cm (length x height).
- 3.2.2018 - 29.4.2018.
- I improvised the piecing/pattern, but it's a variant of a four-patch. I wanted to use up the last fabric scraps I had of the same fabric I used to cover my office chair. I planned the four-patches based on how much 15x15 cm fabric square and halves I could cut out from the fabric.
- The upholstery fabric that's mentioned above, and denim squares out of old jeans.
Batting, backing and binding fabric:
- Single layer of medium polyester batting (100 g, 1 cm thick) bought at Kruunun Kangas.
- Newly bought slightly stretchy fabric I found at Eurokangas.
- Binding was made out of the same fabrics I had used in the quilt (denim scraps, both blue roses fabrics). The binding I did on this quilt is via a method I read on a blog*, and I’ve tried to find it again to be able to link to the woman who wrote about it. If I find it later, I'll put a link to it here.
*And when you usually read blogs late late late at night and forget to pin it right away, it's really difficult to remember on what blog you read it to begin with...
Quilting pattern:
- The outer border is a continuous loop-de-loop pattern I did with free motion quilting. I used a 100/16 standard needle, and did it more slowly than I usually quilt. I didn't want a repeat of the needle and free motion quilting presser foot breaking debacle I had with Fake Cathedral Windows! I also used thicker thread in the top than the bottom, to get it to show up better on the thick denim border.
- The inner border has its denim squares free motion quilted using paper stencils. The rose pattern I used was a free printable image called ”Sweet as a Rose” I found on the pageQuilting Support by Rebecca Humburg. I found her Facebook page too. The thicker top thread was used for this too.
- The center is straight line quilted on the diagonal. I'm so glad my Pfaff sewing machine has a built in walking foot, because it sure helped with this. I also used the same thicker top thread for this.
Top thread:
- For piecing, Gutermann Mara 120, 100% polyester, 1000m, color 800 (white).
- For quilting, Gutermann Extra Stark, 100% polyester, 100m, color 800 (white). I took me 2 spool to get it all quilted, since the paper stencil patterns used up the most.
Bobbin thread:
- For piecing, Gutermann Mara 120, 100% polyester, 1000m, color 800 (white).
- For quilting, the same, and I used a bit more than 6 filled bobbins.
So, I made the top at the Jeans Workshop-course at Arbis back in February. It was my leader/ender-project while I was working on other things.

And then the top languished for nearly a month, until I decided it needed to be ironed and folded up so it would be ready to use when I got around to quilting it.

Sine I learned how long arm quilters store their projects until they get around to quilting them, I also think this is the best way to store quilt tops: ironed and neatly folded on a hanger.

So, a bit more than two months after the top was made, I found a matching backing fabric quite by accident at Eurokangas. After that, as soon as the fabric had been washed and dried and ironed, I started making the quilt sandwich. (I spray baste, because I like the ease of it.)
After I had done that, I turned it around to smooth out any wrinkles.

Then, when the back looked as smooth and good as the front, I was happy. I could start quilting.

Little boy thought the roll of batting (inside the protective plastic wrap) was oodles of fun to play with. I thought it was no harm to let him do that, sine the batting wouldn't become dirty. So, he "drove" it around a bit.

Now, this is something I do before I start doing any quilting: I stitch near the outer edge all around the quilt. On a long arm machine, quilters do this to prevent the quilt top and batting (that's floating on top of the backing) to shift.
Most domestic machine quilters recommend that you quilt from the center and outwards, but I have found out that for me it is easier to do it like this:
- stitch down the edges, which prevents shifts (and also stops the edge from getting caught up in stuff and get stuff caught in the batting).
- cut off any excess batting and backing from the edge.
- stitch down pre-quilting lines (which can be stitch-in-the-ditch, but they need to run the length and width of the quilt) to stop any further shift.
- quilt any free motion or other motifs you want to add, taking care to make sure any quilting that you want near the edges to either come over the edges or stay perhaps 2-3 cm from it.
- add any other embellishments
- bind the quilt in the way you prefer, which for me is always done by machine.
- sew in all the "dangling ends"
Here, I've stitched around the edge and cut off the rest. I love my "Moomin mom" Fiskars-scissors by the way.

I did it a bit different this time, because I free motion quilted the outer border before I did the diagonal straight stitched seams in the center. Why? Well, quite frankly because I at this point only knew I wanted the loop-de-loop pattern on the edge.
I love that pray glue-basting allows me to get away with that.
As you can see in this photo, I started at one point and just quilted (without breaking thread!!) around the whole edge. But then, when I was about one "denim square" away from the beginning, I noticed that I had quilted more densely at the end, so I stopped and got out the seam ripper.
I ripped out perhaps "half a denim square" of the quilting, and then continued with the loop-de-loop so that it ended precisely where the old quilting began.

Here, the loop-de-loop is already quilted, and I've also done the straight diagonal lines in the center. Only the inner border is left to be quilted.

The previous quilting was done during one day, and in the evening (after our family had had dinner and it was time for the kids to head to bed) I had gotten this idea that I wanted to quilt roses on the inner border, to go with the theme of "Blue roses".
So I searched around on the internet, and found (thanks to google once again) this rose pattern I really liked on this page called Quilting Support by Rebecca Humburg. Yeah, there's a first time for everything, and apparently printing out a lot of roses and learning to paper stencil quilt late at night is one of them...
I used regular pins to hold the stencils in place.

I continued with the roses the next day. Daylight made it a lot easier. Being less tired helped too ;)

I had to use tweezers to pick out the smallest bits of paper from them. Everything else I was able to just rip away.

Then, the quilting was complete, and I could start on the binding.
This very specific way of binding a quilt was, as I already wrote above in the info, something I read really late on night while already in bed. It was on a blog, and it was a woman that had written about it like a mini-tutorial. I remember her mentioning that she had either seen or heard someone else use this technique on a quilt submitted to a quilt show.
And when I later tried to find the blog post (out of the about 300 blogs I follow on Bloglovin') I couldn't find it. What a bummer.
But, anyway, look at the photos below and you see how it's done. I really recommend using fabrics with a tighter weave, and on the bias, because of the way it stars to unravel after you've sewn it.
Live and learn... *sigh*

Just continue sewing them down all the way around the edge.

And then, you just cut away the part of the flaps a bit from where you've sewn. It's okay if it they're a bit uneven, I noticed that after washing it all begins to look like the edge on a rag quilt anyway, and then you don't notice it anymore.

I saved the largest of the cut offs and put them in my scrap user system boxes under "Blue" and "Neutral".

Here's how it looked afterwards, on the back and on the front.

And speaking about the Moomin-scissors: I had to bribe the kids with some Moomin-lollipops to get them to allow me to sew the binding down in peace. But, mommy still had to help take the wrappers off, and they just happened to be put in the sewing trash bin.
*sigh*
Moomin-themed quilting in Finland. How quaint. (Because Moomin is from Finland, and the author Tove Jansson was Finnish-Swedish just like me.).

So, all done.
And so, this is how the back turned out. I think it's funny how the roses make up this striped pattern when used like this. It kinda looks a little like sea waves too.

And of course, the front. And that was the story of me making this quilt :)

And then, I even had it on display at the Spring Exhibition at Arbis! I wrote about that one too, here.

Happy quilting, everybody :)
~~~~~~~~~~~~~
PLEASE ask permission BEFORE you PUBLICLY copy anything from my blog.
All images, all my text, and content that I specifically haven't referenced as belonging to someone else on this site are my property and they cannot be used, copied or transmitted without my consent.The exception here is Pinterest, because I give you permission to pin my photos there IF YOU CITE THEM AS COMING FROM THIS BLOG AND THUS FROM ME.
I understand that Pinterest is useful for saving tutorials and photos for quilting inspiration, because I use it that way myself, and I'm okay with you doing that too - but PLEASE: "cite when you write". Give the creator some credit, will you? I have nothing against you trying to make something similar, or even selling it, but I'd like to get some credit for being your inspiration. Why? Well, because lots of crafts are passed down from person to person, and it feels nice to be able to say "yes, I taught you how to make that".
What I DON*T LIKE is you flat out stealing my photos and my written text.
If you want, check out my own shared Pinterest board: My creations
Or my Flickr photos: My photostream
For questions or further permissions, please email me at linnea.gronstrand [at]gmail[dot]com


Comments
Post a Comment